How to Set Up Meta (Facebook) Conversion API with Google Tag Manager (2026)
This article guides marketers through setting up Facebook Conversion API and server-side tracking using Google Tag Manager in 2026. It covers creating a server container, configuring server-side tracking, and setting up events like page views, view item, add to cart, and begin checkout. The guide emphasizes the importance of custom domains, variable creation, and parameter configuration. It provides step-by-step instructions for each event, ensuring comprehensive tracking of user interactions and enhancing data collection beyond traditional browser-based methods.

Meta (Facebook) Conversion API has become a baseline requirement in 2026. If you rely only on the Meta Pixel, you are almost certainly missing conversions due to iOS privacy restrictions, consent banners, and ad blockers.
Google Tag Manager, specifically server-side Google Tag Manager, is one of the most common ways advertisers attempt to implement Meta Conversion API themselves.
This guide explains what Meta CAPI with GTM actually does, how to set it up step by step, and where this approach still falls short for ecommerce businesses.
What Meta Conversion API Does (In Plain English)
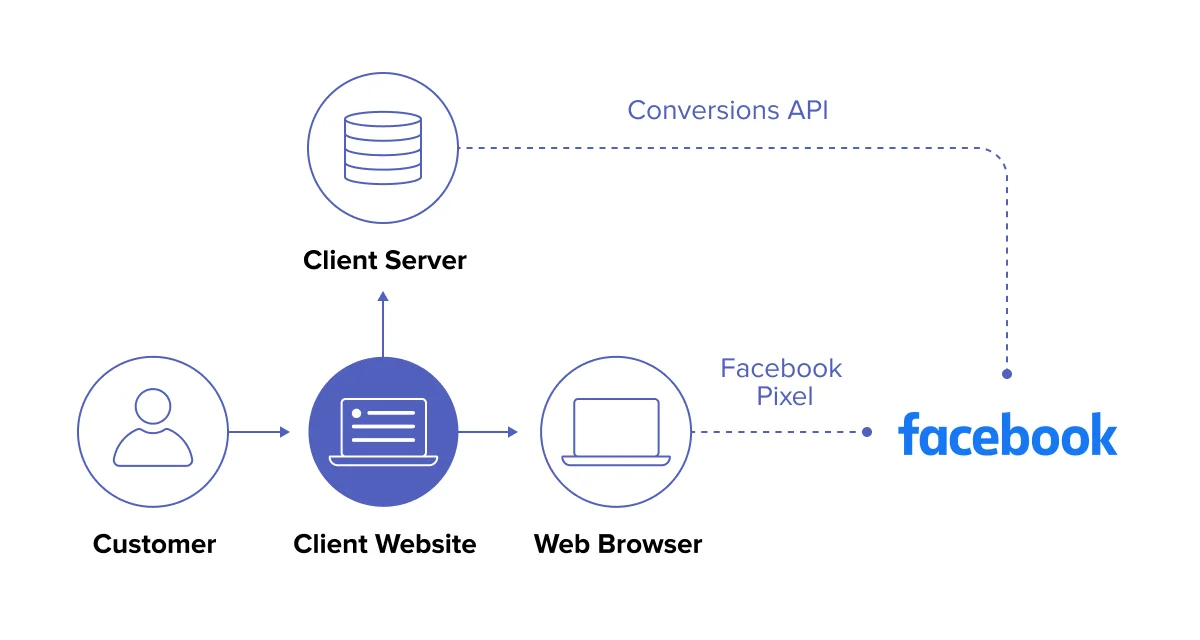
Meta Conversion API allows you to send conversion events directly to Meta’s servers instead of relying only on browser-based pixel events.
With pixel-only tracking, a purchase event must fire in the user’s browser. If the browser blocks the request, Meta never sees the conversion. With Conversion API, the event is sent server-to-server, which makes it far more resilient.
The key point is that Conversion API does not automatically fix tracking. It only improves reliability if the event source itself is reliable.
Why Google Tag Manager Is Often Used for Meta CAPI
Many advertisers choose Google Tag Manager because it centralizes tracking logic and avoids hardcoding scripts into the website.
In 2026, this setup almost always involves server-side Google Tag Manager, which runs in a cloud environment rather than in the browser. This allows events to be forwarded to Meta even when browser scripts fail.
However, GTM-based CAPI setups still require careful configuration to work correctly.
What You Need Before You Start
Before setting anything up, make sure the foundations are in place.
You need full access to your Meta Business portfolio and Events Manager. You also need admin access to your Google Tag Manager account.
A Google Analytics 4 property must already be set up, because Meta’s GTM integration relies on GA4 events as the data source. Finally, you need both a web container and a server container in Google Tag Manager, along with a tagging server URL running on Google Cloud.
Without these pieces, the setup will not work reliably.
Step-by-Step: Setting Up Meta Conversion API with Google Tag Manager
Step 1: Create or Verify Your Meta Dataset
In Meta Events Manager, make sure you have a dataset (formerly called a pixel). If you don’t have one yet, create it first. This dataset will receive both browser and server events.
Step 2: Set Up Server-Side Google Tag Manager
Inside Google Tag Manager, create a new server container if you don’t already have one. This container must be deployed on Google Cloud and connected to a tagging server URL, usually a custom subdomain like gtm.yourdomain.com.
Your existing web container should be configured to send events to this server container instead of directly to third-party endpoints.
Step 3: Ensure GA4 Web Tag Is Properly Configured
Meta’s GTM-based Conversion API setup uses GA4 as the event transport layer.
Make sure your GA4 web tag is firing correctly and sending standard ecommerce events such as purchase, add_to_cart, and begin_checkout. These events are what the server container will receive and forward to Meta.
If GA4 is missing conversions, Meta CAPI will miss them too.
Step 4: Connect Google Tag Manager in Meta Events Manager
In Meta Events Manager, go to Partner Integrations and select Google Tag Manager.
Choose “Set up with Google” and connect the correct Google account. Select your GTM web container, then select the server container you created earlier. You will be asked to enter your tagging server URL and your GA4 Measurement ID.
Once completed, Meta will automatically create server-side tags inside your GTM container.
Step 5: Configure Event Deduplication
Deduplication is critical.
Meta expects the same event_id value to be sent with both the browser pixel event and the server event. If these IDs don’t match, Meta may double-count conversions or discard them entirely.
Google Tag Manager provides several ways to generate and reuse the same event ID across client-side and server-side tags. This step is often misconfigured and is a common reason CAPI setups fail.
Step 6: Test Events in Meta Events Manager
Once everything is published, use Meta’s Test Events tool to verify that server events are arriving correctly.
You should see events marked as “Server” or “Server + Browser” with no deduplication warnings. If events are missing or delayed, the issue is usually upstream in GA4 or the web container.
Common Pitfalls with GTM-Based Meta CAPI Setups
Even when all steps are followed, many setups still underperform.
A major issue is that GA4 events often originate in the browser. If the purchase event never fires client-side, the server never receives it either. In that case, Conversion API cannot recover the conversion.
Another common problem is low match quality. If parameters like email, phone number, IP address, or user agent are missing or hashed incorrectly, Meta struggles to match conversions to users, which hurts optimization.
Finally, GTM setups add complexity. More moving parts mean more potential points of failure.
Why GTM + Meta CAPI Still Isn’t Ideal for Ecommerce
While this setup is better than pixel-only tracking, it still depends heavily on frontend signals.
If the browser blocks the purchase event entirely, no GA4 event is sent, no server event is triggered, and Meta still misses the conversion.
For ecommerce businesses, the most reliable source of truth is not the thank-you page. It’s the store backend.
A Simpler, More Reliable Alternative for Ecommerce
Instead of triggering Meta Conversion API from GA4 or GTM events, platforms like wetracked.io send conversions directly from the ecommerce backend.
wetracked.io captures purchases server-side from Shopify or WooCommerce, enriches them with first-party data, and pushes them straight into Meta using Conversion API.
This removes dependency on browser events, consent banners, and GA4 entirely. According to wetracked.io’s documentation, merchants typically recover a large share of conversions that were previously missing with pixel-only or GTM-triggered setups .
The setup takes minutes instead of days, and the data lands directly in Ads Manager, where it actually affects optimization.
Final Takeaway
Setting up Meta Conversion API with Google Tag Manager is a valid step forward in 2026, especially compared to pixel-only tracking.
However, it’s important to understand its limitations. A GTM-based setup still relies on frontend events and GA4, which means it cannot fully eliminate data loss for ecommerce businesses.
If your goal is maximum accuracy and stable Meta Ads performance at scale, the real improvement comes from backend-first, server-side tracking, not just adding another layer on top of browser events.
Implementing Facebook Conversion API and server-side tracking through Google Tag Manager offers marketers powerful tools for comprehensive data collection. This setup enhances the accuracy of user interaction tracking and provides valuable insights for marketing campaigns. By following the detailed steps for each event configuration, marketers can leverage advanced tracking capabilities alongside traditional methods. This approach ensures more precise data collection, leading to better-informed marketing strategies and improved campaign performance in the evolving digital landscape of 2026.

.png)


